
前言
对于 PVE 的核显直通对于不同的软件版本以及不同的硬件平台配置不尽相同,我也无法尝试验证每种组合下的配置情况,因此在这里给出我的配置环境以供大家参考:
- CPU:Intel N100
- ProxmoxVE:8.2.2
- Linux kernel:6.8.4-2-pve
系统配置之前,检查下 BIOS 的这些功能是否正确开启(畅网 N100/N305 默认开启):
- Intel VMX 虚拟化技术 (需要开启)
- VT-d (需要开启)
- SR-IOV (需要开启)
- IOMMU (需要开启)
- VMD setup menu (需要关闭)
开启 IOMMU 直通
Grub 引导
Grub 是一个引导加载器,当电脑开机时,它会先被载入,然后 GRUB 将负责加载操作系统。内核命令行需要放在变量 GRUB_CMDLINE_LINUX_DEFAULT 文件中 /etc/default/grub 中,打开这个文件进行如下修改:
GRUB_CMDLINE_LINUX_DEFAULT="quiet intel_iommu=on iommu=pt pcie_acs_override=downstream i915.enable_guc=3 i915.max_vfs=7"
intel_iommu与intel_iommu=on:这会启用 Intel 的 IOMMU, IOMMU 是输入 / 输出内存管理单元,主要用于虚拟化情境,允许主机和虚拟机共享硬件资源;i915.enable_guc=3与i915.max_vfs=7:Intel i915 驱动所需(来源于所需的内核参数);video=vesafb:off与video=efifb:off:不加载 vesafb 是 veas 设备 的 fb ,efifb 是指 uefi 设备 的 fb ,在 PVE 7.3 之后版本用initcall_blacklist=sysfb_init替代(来源于 PVE 7.3 优化和显卡直通);pcie_acs_override=downstream:是为了将 iommu groups 拆分,方便直通一些板载的设备(来源于加强硬件直通的功能)。这个参数可能在多个虚拟机使用同一 PCIe 设备时有所帮助,通常是在硬件层面上对虚拟机进行隔离;video=efifb:off,vesafb:off:efifb:off:禁用 efi 启动的显示设备;vesafb:off:禁用 legacy 启动的显示设备。
Systemd-boot 引导
对于随 ZFS 一起安装的 EFI 系统,将使用根文件系统 systemd-boot。所有其他部署都使用标准的 Grub 引导加载程序(这通常也适用于安装在 Debian 之上的系统)。systemd-boot 是一个轻量级的 EFI 引导加载程序。它直接从安装它的 EFI 服务分区 (ESP) 读取内核和 initrd 映像。从 ESP 直接加载内核的主要优点是,它不需要重新实现用于访问存储的驱动程序。内核命令行需要作为一行放在 /etc/kernel/cmdline 中,修改如下:
root=ZFS=rpool/ROOT/pve-1 boot=zfs intel_iommu=on iommu=pt i915.enable_guc=3 i915.max_vfs=7
要应用更改,请运行 proxmox-boot-tool 刷新,这会将其设置为 loader/entries/proxmox-*.conf 中所有配置文件的选项行。
# proxmox-boot-tool refresh Running hook script 'proxmox-auto-removal'.. Running hook script 'zz-proxmox-boot'.. Re-executing '/etc/kernel/postinst.d/zz-proxmox-boot' in new private mount namespace.. Copying and configuring kernels on /dev/disk/by-uuid/AD4C-36C9 Copying kernel and creating boot-entry for 6.8.4-2-pve Copying and configuring kernels on /dev/disk/by-uuid/AD4C-A52A Copying kernel and creating boot-entry for 6.8.4-2-pve
验证配置
验证是否成功启用 IOMMU:
# dmesg | grep -e DMAR -e IOMMU [ 0.012712] ACPI: DMAR 0x0000000073166000 000088 (v02 INTEL EDK2 00000002 01000013) [ 0.012751] ACPI: Reserving DMAR table memory at [mem 0x73166000-0x73166087] [ 0.100058] DMAR: Host address width 39 [ 0.100060] DMAR: DRHD base: 0x000000fed90000 flags: 0x0 [ 0.100071] DMAR: dmar0: reg_base_addr fed90000 ver 4:0 cap 1c0000c40660462 ecap 29a00f0505e [ 0.100076] DMAR: DRHD base: 0x000000fed91000 flags: 0x1 [ 0.100082] DMAR: dmar1: reg_base_addr fed91000 ver 5:0 cap d2008c40660462 ecap f050da [ 0.100086] DMAR: RMRR base: 0x0000007c000000 end: 0x000000803fffff [ 0.100091] DMAR-IR: IOAPIC id 2 under DRHD base 0xfed91000 IOMMU 1 [ 0.100094] DMAR-IR: HPET id 0 under DRHD base 0xfed91000 [ 0.100096] DMAR-IR: Queued invalidation will be enabled to support x2apic and Intr-remapping. [ 0.101901] DMAR-IR: Enabled IRQ remapping in x2apic mode [ 0.309007] pci 0000:00:02.0: DMAR: Skip IOMMU disabling for graphics [ 0.387940] DMAR: No ATSR found [ 0.387942] DMAR: No SATC found [ 0.387944] DMAR: IOMMU feature fl1gp_support inconsistent [ 0.387945] DMAR: IOMMU feature pgsel_inv inconsistent [ 0.387947] DMAR: IOMMU feature nwfs inconsistent [ 0.387949] DMAR: IOMMU feature dit inconsistent [ 0.387951] DMAR: IOMMU feature sc_support inconsistent [ 0.387952] DMAR: IOMMU feature dev_iotlb_support inconsistent [ 0.387954] DMAR: dmar0: Using Queued invalidation [ 0.387959] DMAR: dmar1: Using Queued invalidation [ 0.389786] DMAR: Intel(R) Virtualization Technology for Directed I/O
验证是否成功启用 IOMMU 中断重映射:
# dmesg | grep remapping [ 0.100096] DMAR-IR: Queued invalidation will be enabled to support x2apic and Intr-remapping. [ 0.101901] DMAR-IR: Enabled IRQ remapping in x2apic mode
如果失败或者没有,可能没有 启用 IOMMU 中断重映射 会导致无法直通,此时请参阅 PVE 直通显卡 & Intel SRIOV# 开启 IOMMU 和硬件直通功能的第 7 点。
加载 vifo 内核模块
/etc/modules 是 Linux 系统中的一个配置文件,它用于列出在启动时应该自动载入的核心模组,这些模组通常是设备驱动或其他特殊功能的驱动,它们不是核心的固定部分,但可能是系统正常运行所需的。
当系统启动时,init 进程或相关的启动服务会读取 /etc/modules 文件,并使用 modprobe 命令来载入其中列出的每一个模组。
例如,如果你有一个特定的硬体设备,如某种无线网卡,它需要一个特定的驱动来运行,但这个驱动不是预设载入的。在这种情况下,你可以将该驱动的模组名称添加到 /etc/modules 文件中,确保每次系统启动时它都会被载入。
打开 /etc/modules 加入如下内容:
vfio vfio_iommu_type1 vfio_pci # vfio_virqfd
vfio:这是 VFIO(Virtual Function I/O)的主模组。 VFIO 是一种提供安全和模块化的方法来访问硬件的框架,通常用于虚拟化;vfio_iommu_type1:这是 VFIO 的 IOMMU 驱动,它支持 Type 1 (I/O Virtualization);vfio_pci:这个模组是用于 PCI/PCIe 设备的 VFIO 驱动;vfio_virqfd:这是一个支持 VFIO 虚拟中断的模组(vfio_virqfd在 Linux Kernel 6.2 以上版本中无需加载,来源于 Proxmox#Kernel Modules)。
将这些模组添加到 /etc/modules 会确保在系统启动时它们被载入,这通常在设置硬件虚拟化或特定的硬件直通(如 GPU 直通到虚拟机)时是必要的。使得系统在必要时启用 IOMMU 转换,将 iommu 分组相关的内核模块启用,从而可以提高 VM 中未使用的 PCIe 设备的性能。
在完成如上修改后需要刷新 initramfs ,在 Proxmox VE 上,可以通过执行以下命令来完成:
# update-initramfs -u -k all
SR-IOV 核显虚拟化
Intel SR-IOV vGPU 是一种硬件虚拟化技术,它允许多个虚拟机共享单个物理 GPU,而不会降低性能。SR-IOV 定义了一种标准方法,通过将设备分区为多个虚拟功能来共享物理设备功能。每个虚拟功能直接分配给一个虚拟机,从而实现了接近本地性能的虚拟机。Intel Graphics SR-IOV 是 Intel 的最新图形虚拟化技术,它允许多个虚拟机共享单个物理 GPU,从而实现了在虚拟机中的 GPU 加速工作负载。
准备工作
添加 Promox 源:
# echo "deb http://download.proxmox.com/debian/pve bookworm pve-no-subscription" > /etc/apt/sources.list.d/pve.list apt update
若进行过内核版本升级,使用下面命令重新安装内核和内核头并切换,以避免虚拟化失败,若未升级过请忽略。
# apt install pve-kernel-$(uname -r) # proxmox-boot-tool kernel pin $(uname -r) # apt install pve-headers-$(uname -r)
安装构建工具:
# apt install build-* dkms
安装核显驱动
克隆 Linux i915 驱动程序(dkms 模块)仓库到本地,然后执行命令如下:
# git clone https://github.com/strongtz/i915-sriov-dkms.git # cd i915-sriov-dkms/ # dkms add . Creating symlink /var/lib/dkms/i915-sriov-dkms/2024.09.21/source -> /usr/src/i915-sriov-dkms-2024.09.21 # dkms install -m i915-sriov-dkms -v $(cat VERSION) --force Sign command: /lib/modules/6.8.4-2-pve/build/scripts/sign-file Signing key: /var/lib/dkms/mok.key Public certificate (MOK): /var/lib/dkms/mok.pub Certificate or key are missing, generating self signed certificate for MOK... Building module: Cleaning build area... make -j4 KERNELRELEASE=6.8.4-2-pve -C /lib/modules/6.8.4-2-pve/build M=/var/lib/dkms/i915-sriov-dkms/2024.09.21/build................................ Signing module /var/lib/dkms/i915-sriov-dkms/2024.09.21/build/i915.ko Cleaning build area... i915.ko: Running module version sanity check. - Original module - Installation - Installing to /lib/modules/6.8.4-2-pve/updates/dkms/ depmod...
验证安装状态如下则为安装成功:
# dkms status i915-sriov-dkms/2024.09.21, 6.8.4-2-pve, x86_64: installed
为了启用 VF,必须安装 sysfsutils 以设置 sysfs 属性:
# apt install sysfsutils
使用 lspci | grep VGA 查找 iGPU 所在的 PCIe 总线:
# lspci | grep VGA 00:02.0 VGA compatible controller: Intel Corporation Alder Lake-N [UHD Graphics]
添加 VFs 参数如下:
# echo "devices/pci0000:00/0000:00:02.0/sriov_numvfs = 3" > /etc/sysfs.conf
下面命令中 sriov_numvfs = 3 的 3 代表 SRIOV 核显数量,可自定义设定(N100 建议最高 3),最多设置 7 个设置为 1 个性能最强,如果设置为 7 个,那么每一个的性能只有 14%。
安装 i915 驱动
在重启后并未按照预期的出现虚拟的显卡设备,查看 dmesg 信息如下:
# lspci | grep VGA 00:02.0 VGA compatible controller: Intel Corporation Alder Lake-N [UHD Graphics] # dmesg | grep i915 use xe.force_probe='46d1' and i915.force_probe='!46d1' [ 4.719154] i915: module verification failed: signature and/or required key missing - tainting kernel [ 5.051857] i915 0000:00:02.0: [drm] VT-d active for gfx access [ 5.051891] i915 0000:00:02.0: vgaarb: deactivate vga console [ 5.051952] i915 0000:00:02.0: [drm] Using Transparent Hugepages [ 5.052339] i915 0000:00:02.0: vgaarb: VGA decodes changed: olddecodes=io+mem,decodes=io+mem:owns=io+mem [ 5.053221] mei_hdcp 0000:00:16.0-b638ab7e-94e2-4ea2-a552-d1c54b627f04: bound 0000:00:02.0 (ops i915_hdcp_ops [i915]) [ 5.063112] i915 0000:00:02.0: [drm] Finished loading DMC firmware i915/adlp_dmc.bin (v2.20) [ 5.066881] i915 0000:00:02.0: [drm] GT0: GuC firmware i915/adlp_guc_70.bin version 70.20.0 [ 5.066892] i915 0000:00:02.0: [drm] GT0: HuC firmware i915/tgl_huc.bin version 7.9.3 [ 5.071567] i915 0000:00:02.0: [drm] GT0: HuC: authenticated for all workloads! [ 5.072232] i915 0000:00:02.0: [drm] GT0: GUC: submission enabled [ 5.072235] i915 0000:00:02.0: [drm] GT0: GUC: SLPC enabled [ 5.072557] i915 0000:00:02.0: [drm] GuC RC: enabled [ 5.072603] i915 0000:00:02.0: [drm] *ERROR* GT0: GUC: mmio request 0x4100: failure 201/0 [ 5.072607] i915 0000:00:02.0: [drm] *ERROR* GT0: Failed to retrieve hwconfig table: -ENOENT [ 5.073472] mei_pxp 0000:00:16.0-fbf6fcf1-96cf-4e2e-a6a6-1bab8cbe36b1: bound 0000:00:02.0 (ops i915_pxp_tee_component_ops [i915]) [ 5.073653] i915 0000:00:02.0: [drm] Protected Xe Path (PXP) protected content support initialized [ 5.074657] [drm] Initialized i915 1.6.0 20201103 for 0000:00:02.0 on minor 0 [ 5.077229] i915 0000:00:02.0: [drm] Cannot find any crtc or sizes [ 5.077232] snd_hda_intel 0000:00:1f.3: bound 0000:00:02.0 (ops i915_audio_component_bind_ops [i915]) [ 5.077732] i915 0000:00:02.0: [drm] Cannot find any crtc or sizes [ 5.078040] i915 0000:00:02.0: [drm] Cannot find any crtc or sizes
Debian 中的 backports 存储库是一个额外的软件源,它包含了针对最新 Debian 稳定版本的软件包的更新版本。这些软件包经过测试,可以安全地在当前稳定版本上运行,但可能会包含新功能或修复了一些 bug。backports 存储库允许用户在不升级整个操作系统的情况下,使用最新的软件包。
尝试安装英特尔向后兼容显卡驱动程序 (intel-gpu-i915-backports):
# apt install flex bison # 安装依赖 # wget https://github.com/moetayuko/intel-gpu-i915-backports/releases/download/I915MT65-24.1.19-4/intel-i915-dkms_1.24.1.19.240119.1.nodrm+i4-1_all.deb # 下载发布页最新软件包 # sudo dpkg -i intel-i915-dkms_1.24.1.19.240119.1.nodrm+i4-1_all.deb # 安装软件包
配置验证
完成上述的所有配置后重启系统,验证 SR-IOV 过程如下,可以看到已经成功多出 3 个 SR-IOV 显卡设备:
# dmesg | grep i915 [ 0.000000] Command line: initrd=\EFI\proxmox\6.8.4-2-pve\initrd.img-6.8.4-2-pve root=ZFS=rpool/ROOT/pve-1 boot=zfs intel_iommu=on iommu=pt i915.enable_guc=3 i915.max_vfs=7 [ 0.040311] Kernel command line: initrd=\EFI\proxmox\6.8.4-2-pve\initrd.img-6.8.4-2-pve root=ZFS=rpool/ROOT/pve-1 boot=zfs intel_iommu=on iommu=pt i915.enable_guc=3 i915.max_vfs=7 use xe.force_probe='46d1' and i915.force_probe='!46d1' [ 4.806867] i915_compat: module verification failed: signature and/or required key missing - tainting kernel [ 5.230381] i915 0000:00:02.0: Running in SR-IOV PF mode [ 5.231451] i915 0000:00:02.0: [drm] VT-d active for gfx access [ 5.243440] i915 0000:00:02.0: vgaarb: deactivate vga console [ 5.243530] i915 0000:00:02.0: [drm] Using Transparent Hugepages [ 5.244051] i915 0000:00:02.0: vgaarb: VGA decodes changed: olddecodes=io+mem,decodes=io+mem:owns=io+mem [ 5.244971] mei_hdcp 0000:00:16.0-b638ab7e-94e2-4ea2-a552-d1c54b627f04: bound 0000:00:02.0 (ops i915_hdcp_ops [i915]) [ 5.257331] i915 0000:00:02.0: [drm] Finished loading DMC firmware i915/adlp_dmc.bin (v2.20) [ 5.261143] i915 0000:00:02.0: [drm] GT0: GuC firmware i915/tgl_guc_70.bin version 70.20.0 [ 5.261154] i915 0000:00:02.0: [drm] GT0: HuC firmware i915/tgl_huc.bin version 7.9.3 [ 5.265949] i915 0000:00:02.0: [drm] GT0: HuC: authenticated for all workloads [ 5.266619] i915 0000:00:02.0: [drm] GT0: GUC: submission enabled [ 5.266623] i915 0000:00:02.0: [drm] GT0: GUC: SLPC enabled [ 5.266964] i915 0000:00:02.0: [drm] GT0: GUC: RC enabled [ 5.290361] [drm] Initialized i915 1.6.0 20201103 for 0000:00:02.0 on minor 1 [ 5.292354] i915 display info: display version: 13 [ 5.292357] i915 display info: cursor_needs_physical: no [ 5.292359] i915 display info: has_cdclk_crawl: yes [ 5.292360] i915 display info: has_cdclk_squash: no [ 5.292360] i915 display info: has_ddi: yes [ 5.292361] i915 display info: has_dp_mst: yes [ 5.292362] i915 display info: has_dsb: yes [ 5.292363] i915 display info: has_fpga_dbg: yes [ 5.292364] i915 display info: has_gmch: no [ 5.292364] i915 display info: has_hotplug: yes [ 5.292365] i915 display info: has_hti: no [ 5.292366] i915 display info: has_ipc: yes [ 5.292366] i915 display info: has_overlay: no [ 5.292367] i915 display info: has_psr: yes [ 5.292368] i915 display info: has_psr_hw_tracking: no [ 5.292369] i915 display info: overlay_needs_physical: no [ 5.292370] i915 display info: supports_tv: no [ 5.292370] i915 display info: has_hdcp: yes [ 5.292371] i915 display info: has_dmc: yes [ 5.292372] i915 display info: has_dsc: yes [ 5.292517] i915 0000:00:02.0: 7 VFs could be associated with this PF [ 5.319402] snd_hda_intel 0000:00:1f.3: bound 0000:00:02.0 (ops i915_audio_component_bind_ops [i915]) [ 5.320151] fbcon: i915drmfb (fb0) is primary device [ 5.391253] i915 0000:00:02.0: [drm] fb0: i915drmfb frame buffer device [ 6.601864] i915 0000:00:02.0: vgaarb: VGA decodes changed: olddecodes=io+mem,decodes=none:owns=io+mem use xe.force_probe='46d1' and i915.force_probe='!46d1' [ 6.603816] i915 0000:00:02.1: enabling device (0000 -> 0002) [ 6.604200] i915 0000:00:02.1: Running in SR-IOV VF mode [ 6.604959] i915 0000:00:02.1: [drm] GT0: GUC: interface version 0.1.9.0 [ 6.605913] i915 0000:00:02.1: [drm] VT-d active for gfx access [ 6.606250] i915 0000:00:02.1: [drm] Using Transparent Hugepages [ 6.606811] i915 0000:00:02.1: [drm] GT0: GUC: interface version 0.1.9.0 [ 6.607654] i915 0000:00:02.1: [drm] GT0: GUC: interface version 0.1.9.0 [ 6.608908] i915 0000:00:02.1: GuC firmware PRELOADED version 0.0 submission:SR-IOV VF [ 6.609193] i915 0000:00:02.1: HuC firmware PRELOADED [ 6.611864] i915 0000:00:02.1: [drm] PMU not supported for this GPU. [ 6.612296] [drm] Initialized i915 1.6.0 20201103 for 0000:00:02.1 on minor 0 [ 6.614634] i915 0000:00:02.0: vgaarb: VGA decodes changed: olddecodes=none,decodes=none:owns=io+mem [ 6.614918] i915 0000:00:02.1: vgaarb: VGA decodes changed: olddecodes=io+mem,decodes=none:owns=none use xe.force_probe='46d1' and i915.force_probe='!46d1' [ 6.616734] i915 0000:00:02.2: enabling device (0000 -> 0002) [ 6.617082] i915 0000:00:02.2: Running in SR-IOV VF mode [ 6.617873] i915 0000:00:02.2: [drm] GT0: GUC: interface version 0.1.9.0 [ 6.618508] i915 0000:00:02.2: [drm] VT-d active for gfx access [ 6.618822] i915 0000:00:02.2: [drm] Using Transparent Hugepages [ 6.619502] i915 0000:00:02.2: [drm] GT0: GUC: interface version 0.1.9.0 [ 6.620161] i915 0000:00:02.2: [drm] GT0: GUC: interface version 0.1.9.0 [ 6.620815] i915 0000:00:02.2: GuC firmware PRELOADED version 0.0 submission:SR-IOV VF [ 6.621093] i915 0000:00:02.2: HuC firmware PRELOADED [ 6.623685] i915 0000:00:02.2: [drm] PMU not supported for this GPU. [ 6.624056] [drm] Initialized i915 1.6.0 20201103 for 0000:00:02.2 on minor 2 [ 6.626106] i915 0000:00:02.0: vgaarb: VGA decodes changed: olddecodes=none,decodes=none:owns=io+mem [ 6.626384] i915 0000:00:02.1: vgaarb: VGA decodes changed: olddecodes=none,decodes=none:owns=none [ 6.626658] i915 0000:00:02.2: vgaarb: VGA decodes changed: olddecodes=io+mem,decodes=none:owns=none use xe.force_probe='46d1' and i915.force_probe='!46d1' [ 6.628452] i915 0000:00:02.3: enabling device (0000 -> 0002) [ 6.628776] i915 0000:00:02.3: Running in SR-IOV VF mode [ 6.629360] i915 0000:00:02.3: [drm] GT0: GUC: interface version 0.1.9.0 [ 6.629976] i915 0000:00:02.3: [drm] VT-d active for gfx access [ 6.630291] i915 0000:00:02.3: [drm] Using Transparent Hugepages [ 6.630960] i915 0000:00:02.3: [drm] GT0: GUC: interface version 0.1.9.0 [ 6.631664] i915 0000:00:02.3: [drm] GT0: GUC: interface version 0.1.9.0 [ 6.632523] i915 0000:00:02.3: GuC firmware PRELOADED version 0.0 submission:SR-IOV VF [ 6.632766] i915 0000:00:02.3: HuC firmware PRELOADED [ 6.634466] i915 0000:00:02.3: [drm] PMU not supported for this GPU. [ 6.634899] [drm] Initialized i915 1.6.0 20201103 for 0000:00:02.3 on minor 3 [ 6.635409] i915 0000:00:02.0: Enabled 3 VFs # lspci | grep VGA 00:02.0 VGA compatible controller: Intel Corporation Alder Lake-N [UHD Graphics] 00:02.1 VGA compatible controller: Intel Corporation Alder Lake-N [UHD Graphics] 00:02.2 VGA compatible controller: Intel Corporation Alder Lake-N [UHD Graphics] 00:02.3 VGA compatible controller: Intel Corporation Alder Lake-N [UHD Graphics]
配置虚拟机
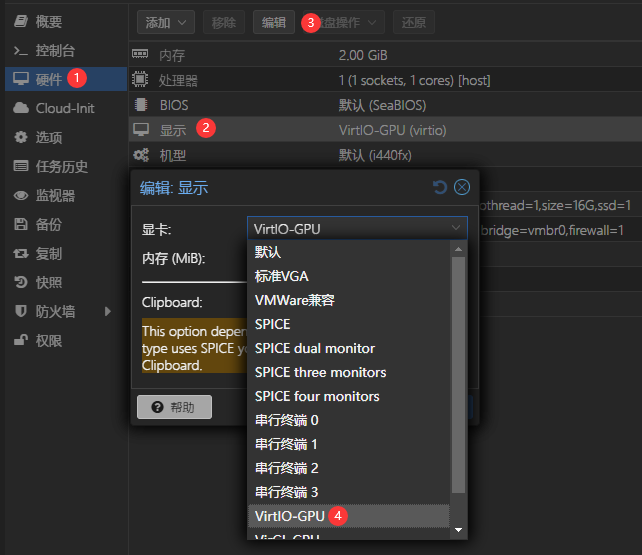
完成显卡的 SR-IOV 配置后我们需要将虚拟出来的显卡添加到虚拟机中,首先需要将虚拟机显示设为无或者 VirtIO-GPU(这里我设置为无时无法启动虚拟机)。
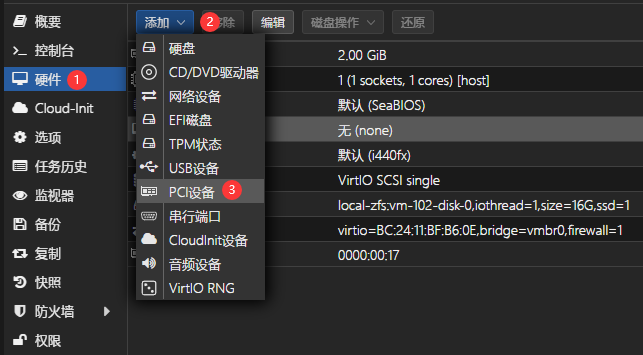
然后为虚拟机添加 PCI 设备。
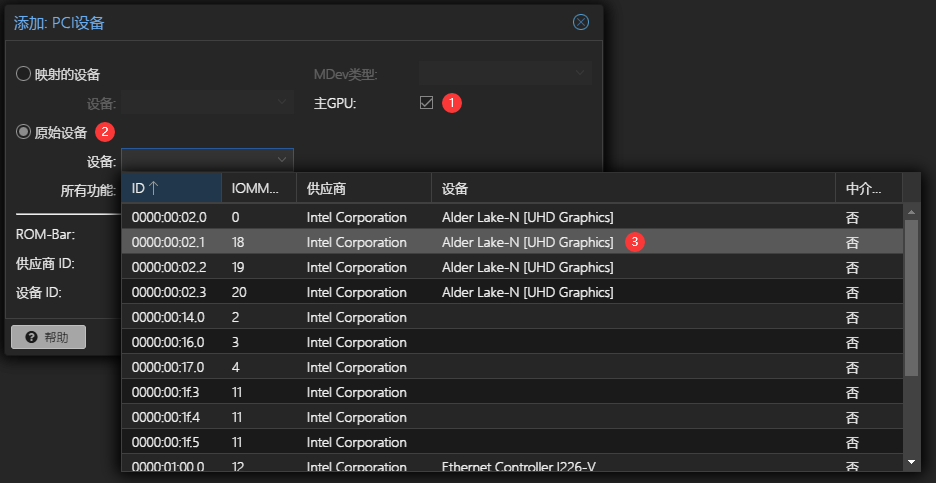
这里需要注意的是不要选择 0000:00:02.0 设备(其他比如 0000:00:02.1,0000:00:02.2 都是可以的),以及不要勾 All Functions(All Functions 会将的 VF 都会被分配到一个虚拟机中),安装 Win 虚拟机时需要勾选主GPU 选项,才能正确安装核显驱动,其他虚拟机按需勾选。
完成配置后启动虚拟机,进入命令行后使用 lspci 确认是否正确的完成显卡直通,直通前后对比如下:
# 配置直通前 00:02.0 VGA compatible controller: Device 1234:1111 (rev 02) # 配置直通后 00:02.0 VGA compatible controller: Red Hat, Inc. Virtio 1.0 GPU (rev 01)
参考
- https://www.cloudstaymoon.com/2024/04/10/all-in-one-1
- https://www.aitxn.com/565.html
- https://post.smzdm.com/p/a5o38n37/
- https://www.cnblogs.com/MAENESA/p/18005241
- https://blog.csdn.net/Abin17618/article/details/135360998
- https://diyforfun.cn/605.html
- https://bbs.cnction.com/forum.php?mod=viewthread&tid=535
- https://blog.csdn.net/tzconn/article/details/142059054
- https://blog.mstg.top/archives/933
- https://foxi.buduanwang.vip/virtualization/pve/1536.html/
- https://www.gitlx.com/2021/03/iommu/
- https://www.151365.io/post/49
- https://www.frostfox.cn/pve/2024/sriov.html

请问给虚拟机添加虚拟出来的显卡后,进入虚拟机,有虚拟的 UHD770 和 VirtIO 对应的 red hat 两张显卡怎么回事?docker 部署 jellyfin 发现,无法调用物理核显
你的情况我没有遇到过,不好意思哈没法给你什么帮助
我的主机是中柏 N305 单网口版本,按照教程成功了,也是虚拟机显示设为无启动不了得用 VirtIO-GPU,还有就是开机的时候 PVE 报错:TASK ERROR: Failed to run vncproxy. 过了会才能连接上